
Products You May Like
Visual drawing, image-rendering techniques to make it look realistic in an airplane space are divided into several categories. Each category specifies the number of missing points that are likely to be involved.
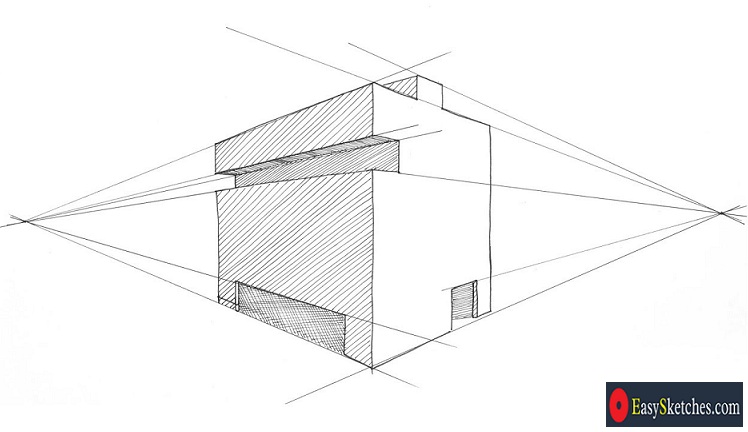
During my previous article, I explained to you how to draw a single point. As a related topic, we will address the steps on how to draw a two-point idea.
The main difference is that two points of view make two projects disappear while the point of view of one point, as shown in their names, has only one. Two points is a direct image viewed from the corner of your photo or a rotating view of your one-point point.
Choose Two Destinations
And then, they would start working now on the next step. Your two missing points are where your image is not visible. These are points where your parallel lines meet on both sides.
It is essential to choose the best place for these points. The distance between the two items will significantly affect the final appearance of your drawing.
Perhaps the best option for your disappearing points is somewhere where your image is the size of the center of your paper.
Draw Orthogonal Line Sets
Next, in the third step, you now have to draw orthogonal line sets. Usually, this is a set of lines drawn at each point of extinction. Orthogonal lines are specified in any straight lines in the image plane that give the shape of temporal drawing to your drawing.
Draw Lines Transversal and Curves
After drawing orthogonal lines, proceed to draw dynamic lines. Dotted lines are vertical lines in an orthogonal line. Since the same planes are rarely found in two-point ideas to draw only the straight lines used for temporary drawing, it would be nice to draw curves and oblique lines on our piece. Curves and oblique lines are sometimes drawn to provide a complete picture of the model to be removed.
After drawing the principles, we are now ready for the final discovery. Key lines should be redrawn to make them more expansive, and guidelines should be deleted.
Fill in the details on your drawing and adjust the tone by blurring the parts using different pencils. Add shadows to your drawing by adding a point as your light source.
It is not difficult for a person to learn to draw pictures. A thorough study of this process in practice will help you a lot. Drawing is not something that takes a long time to learn.
Instead of having a hard time, why not enjoy it? Just take your pencil and paper and start drawing your first piece.