Products You May Like
Basic Body Proportions – In this human body drawing instructional exercise, you’ll learn essential human body layout drawing procedures. Assuming you’ve worked on catching energy in the past instructional exercise, you’ll have obtained a decent vibe for free outlining of individuals. We will begin giving construction to that feeling-based basis by concentrating on the body with a more logical eye.
Get familiar with the essentials of body life structures attracting this instructional exercise.
We will develop this ability from the beginning, in a similar request as the drawing system, beginning with a worked on body drawing skeleton (the fundamental figure or stick figure), continuing to the volumes of muscle design, and afterward, at last, the subtleties of each piece of the body and face.
The main principal abilities to secure are human extents drawing methods. What’s more, we will rehearse with this fundamental figure for some time to get comfortable with the traditional “optimal extents”, yet in addition with how they differ with sex, age, and surprisingly ethnic foundation. (Basic Body Proportions)
On the off chance that you’re drawing carefully, maybe you need your work to look as though it’s made with pencil and paper. If so, may we suggest one of the numerous Photoshop brush sets accessible on GraphicRiver, including this Classic Art Brush Pack?
Brush Pack Professional volume 4 – Classic Art
- What You Will Learn in This Human Body Drawing Tutorial
- The most effective method to draw the human body bit by bit
- Essential human body layout drawing
- Human profile drawing methods
- The human body extents drawing
- Body drawing practice works out
Instructions to Draw a Body: The Basic Figure
Make Your Chart From Heads
We should start with humans drawing nuts and bolts. A proportional figure, paying little heed to varieties because of sexual orientation and such, is characterized by the arrangement of the joints, which is constant (that is, we see something odd assuming it shifts).
This is our preparation for extent. Draw your graph with me as we go—it truly assists with learning the material. (Basic Body Proportions)
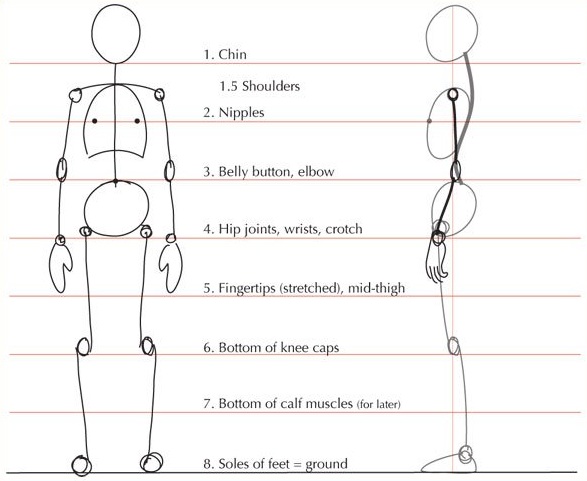
To figure out how to draw a body, we start with the head. Start by drawing an oval or egg shape (sharp end down) for a head, and discount eight estimations, the last one being the ground.
The estimation (optimal male tallness = eight heads) was put down during the Renaissance as an admiration of the human structure. Not many individuals are eight heads tall (even Northern Europeans, who filled in as the reason for this model, are more like seven heads), however, this is as yet the best model, to begin with, as it makes it more straightforward to get a handle on the arrangements.
a-Starting with the head
Human body drawing reference for the head.
The Pelvis
Add the pelvic bone straightaway, improved as a leveled circle between marks 3 and 4, with the hip joints sitting on 4. Its width is generally 1.5 to 2 head widths. You would now be able to draw the spine associating the head to this most significant piece of the body, its focal point of gravity and steadiness.
B-The pelvis
Human body drawing reference for the pelvis.
The Legs and Knees
How about we accept this figure is remaining with the feet in an upward direction lined up with the hip joints. The knee joints sit on mark 6, as that line relates to the lower part of the kneecaps.
At the point when the leg is loosened up, the knee joint is put on a straight line with the hip and lower leg (left). However, this straight line is virtual: to finish the leg, associate the hip joint to within the kneecap, and afterward once more, the outside of the knee to within the lower leg (right).
This is an exceptionally rearranged however exact portrayal of the genuine bone construction, and it helps in drawing the normal look of the human leg, which tightens in from the hip, then, at that point, lurches out at the knee, and tightens in once more. It additionally assists with setting the muscles at a later stage. (Basic Body Proportions)
c-The legs
Human body drawing reference for the legs and knees.
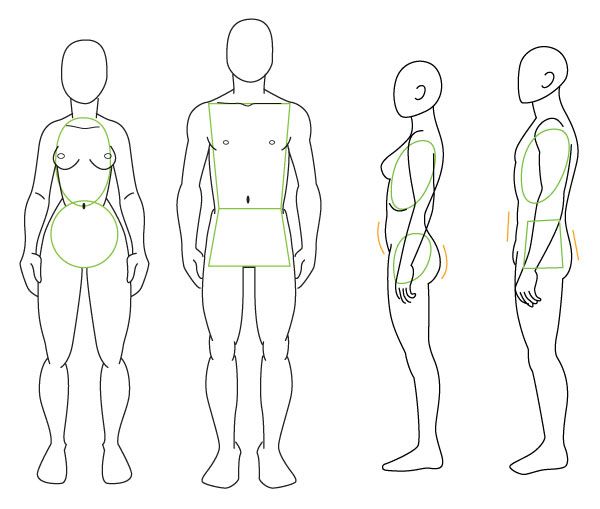
The Ribcage, Nipples, and Belly Button
The ribcage-lungs bunch is the third significant volume of the body, later the head and the pelvis. Rearranged, it is an oval that begins somewhere between 1 and 2, down to check 3; however it is ideal to slash off the lower some portion of it as displayed here to impersonate the real rib confine, as the vacant part between the two volumes is significant:
It is delicate and dependent upon future developments (level gut, delicate gut, wasp midsection) and it is additionally where the most twist and development occurs in the spine. (Basic Body Proportions)
It’s great to know about that and not to connect the middle and pelvis like two squares, as that would “block” your drawing’s scope of movement. The width of the oval is generally equivalent to the pelvis until further notice.
Two additional subtleties here: the areolas fall on mark 2, right inside the sides of the head, and the stomach button on mark 3.
D-The middle
Human body drawing reference for the ribcage.
The Shoulders
The shoulder line is somewhere between marks 1 and 2, with the shoulder width 2 to 3 head widths, however, its obvious position can fluctuate an incredible arrangement. In the first place, it’s marginally bent down, yet in pressure, the shoulders worry and the bend would itself be able to turn up and look higher. (Basic Body Proportions)
Besides, the trapezius muscle, which from the front seems to interface the shoulder with the neck, is exceptionally individual; on the off chance that it’s extremely solid or conveys a lot of fat, it can make the shoulder line look so high there’s no neck; contrarily, an immature trapezius, frequently seen in extremely young ladies, gives the impression of a long neck.
This concise deviation into non-skeletal subtleties is to guarantee there’s no disarray between the real place of the shoulder line and its evident arrangement in a fully explored body, a few instances of which are displayed underneath.
E-The shoulders
Human body drawing reference for the shoulders.
The Arm, Wrists, and Hands
At last, the arms. The wrists are on mark 4, somewhat beneath the hip joints, which sit on it (you can test it out for yourself by standing up and squeezing your wrists against your hips).
The fingers end generally at mid-thigh, which is mark 5. The elbows are a marginally convoluted joint that we’ll analyze exhaustively later, however until further notice it’s useful to stamp them as lengthened ovals sitting on level 3. (Basic Body Proportions)
F-The arms
Human body drawing reference for the arms.
We’re finished… nearly. Before summarizing this current, we should expand those imprints into lines and perceive how this functions in profile.
The most effective method to Draw a Body: The Basic Profile
The following stage in figuring out how to draw a body is the profile. Start by drawing the head once more, a similar egg shape yet with the end pointing corner to corner down, and drop an upward line from the crown to the ground.
In an erect stance, you can put the pelvic bone (a smaller adaptation of the head’s egg), the shoulder, and the knee generally on this upward line. They are on a similar level as in the past: every one of the joints is, yet the others are not on a similar plane as these.
G-Starting the profile
Human profile drawing reference.
The Spine in Profile
From the side, the spine is uncovered as being formed like a leveled “S”. From the foundation of the skull, it drops down and back till it arrives at its uttermost point at the level of the shoulders (between the shoulder bones).
Note the shoulder joints are in front of the spine! This is because, once more, the shoulder “line” is truly a circular segment: the emblem shows a top perspective on it. (Basic Body Proportions)
The spine then, at that point, returns forward and tops once more (internal) a little over the pelvis (the little of the back, which fluctuates top to bottom and can make for an angled back). At last, it shifts bearing again momentarily and closes in the coccyx or tailbone.
H-The spine
Human profile drawing reference for the spine.
The Ribcage and Legs in Profile
The ribcage is firmly appended to the spine, and, in a sensibly fit body standing erect, the chest is normally pushed forward. (Basic Body Proportions)
The hip joint is in front of our upward pivot, and this is offset by the lower leg being somewhat behind it. So our hip-knee-lower leg line is skewed in reverse and staggered once more: from the hip joint to the front of the knee joint, and the rear of the knee joint to the lower leg.
The general impact of this stance is a visual bend from head to chest to feet (in green), and when it’s leveled or switched, we see a vulnerability or slump in the stance.
I-Torso and legs
Human profile drawing reference for the ribcage and legs.
The Arms in Profile
At last, the arms. The upper arm falls genuinely in a very direct way, so the elbow can be lined up with the last option (or fall somewhat in reverse).
In any case, the arm is never completely extended when very still, so the lower arm isn’t upward: the arm is marginally bowed. And the wrist falls forward, directly over the hip bone. (Likewise, when the hand is loose, the fingers twist somewhat, as displayed here).
J-The arms
Human profile drawing reference for the arms.
Step by step instructions to Draw a Body: Summary
This finishes the fundamental, undifferentiated human extents drawing instructional exercise. Here is a graph to summarize all the human body diagram drawing procedures we explored:
Summarizing
Human Body Proportions Drawing Reminders
The accompanying human extents drawings are a couple of valuable visual updates dependent on the body. They prove to be useful when the body isn’t standing upstanding.
Extent updates
Body Drawing Practice Exercises
We’ve covered a ton of material in this body life structure drawing instructional exercise. This present time is a decent opportunity to stop contemplating and find out more about this essential figure and the standards of drawing human body extents. (Basic Body Proportions)
Then, at that point, we’ll continue to the contrasts among male and female designs (and others). For example, you can incorporate this new information into your everyday human drawing portraying practice by overlaying. A fast energy sketch with this accurately proportioned essential figure.
Human Proportions Drawing Tips
I reliably start with the head, yet it doesn’t make any difference which part of the body you begin drawing, assuming you’re agreeable and get a decent outcome.
Assuming that you’re uncertain or are struggling, then, at that point, I recommend attempting with the head first. (Basic Body Proportions)
Become accustomed to drawing this essential figure with a light hand, since the completed body will be developed over it. Customarily, the last lines are inked and the rules then, at that point, deleted (consequently the significance of a light hand), however in any event.
when I’m drawing with a ballpoint pen with the goal of inking on an alternate sheet by straightforwardness,. keeping a light hand guarantees I can see what I’m doing.